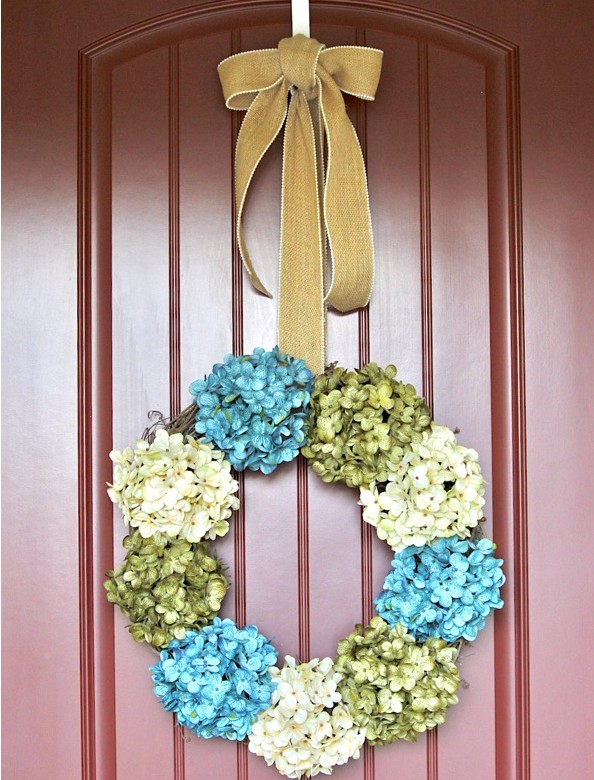
A hydrangea wreath brings a fresh, cheerful touch to any home. It’s classic, easy to personalize, and adds a soft splash of color all year round. That’s why DIY lovers choose it for spaces like front doors and living rooms.
This guide shows just how easy it is to make your own beautiful hydrangea wreath. You’ll find a clear list of supplies, simple steps, and tips for a full, lush look that lasts. Whether you’re new to DIY or have experience, this project helps you add a lovely piece to your home.
Gathering Supplies and Tools
Finding the right supplies is the first step toward a wreath you’ll love seeing every time you walk through the door. Having what you need set up before you begin means the process goes faster and feels much less stressful. Whether you shop online or stroll the aisles at your local craft store, getting quality materials makes a difference. Gather your tools, do a quick double-check, and you’ll be ready to start building your hydrangea wreath with total confidence.
Essential Tools and Where to Find Them: DIY Hydrangea Wreath Supplies Needed
Let’s keep it simple and clear. For a go-to hydrangea wreath, round up these must-have items before you begin:

- 18″ Grapevine Wreath
This sturdy base gives your wreath natural texture and holds everything together. You can find grapevine wreaths at craft stores like Michaels, Hobby Lobby, or even big-box stores with a craft aisle. - 9 Silk Hydrangeas (3 each of 3 separate colors)
Silk hydrangeas are a timeless pick for lasting beauty. Using three shades gives a full, layered look. Hobby Lobby offers large, realistic blooms and has frequent sales, so you can get exactly the style and shades you want. - Wire Cutters
Snip the thick stems of your silk flowers with ease. Choose sharp wire cutters for less hand strain, available at any hardware or craft store. - Floral Wire or Hot Glue/Hot Glue Gun
You’ll want one or both of these to secure flowers in place. Floral wire lets you move things later if you want to swap out blooms for another season, while hot glue offers a fast, rock-solid hold. - 2.5″ Wired Ribbon (about 3 yards)
Wired ribbon shapes into bows and tails that stand up straight. Pick a ribbon that works well with your hydrangea colors. - Wreath Hanger for Your Door
Make sure your new wreath shows off in style with a simple over-the-door hanger. This finish keeps your wreath secure and prevents damage to your door.
Having these essentials on hand keeps you organized, saves time, and makes assembly a breeze.
Optional Additions: Ribbons, Greenery, and Accents
If you want your hydrangea wreath to truly stand out or match a holiday or theme, here’s where you can have some fun. Here are some popular add-ons for personality and pop:
- Extra Greenery
Tuck in artificial eucalyptus, ferns, or ivy for more fullness and texture. - Accent Flowers
Try pops of different flowers like peonies, roses, or daisies to add interest and break up the hydrangea petals. - Seasonal Picks
For fall, add mini pumpkins, pinecones, or berries. For spring and summer, think tiny faux butterflies or pastel florals. In winter, little ornaments or glittery sprigs catch the light. - Decorative Ribbon Bows or Streamers
Switch up the ribbon with bold prints, burlap, or metallics. Layer two ribbons together for extra impact. - Wooden or Metal Signs
“Welcome” or “Home” plaques can sit right in the center or along the bottom edge of your wreath for a personal touch. - Beads or Pearls
Wrap a strand of faux pearls or wooden beads through the grapevine for added detail and visual interest.
Remember, the best wreaths reflect your style. Even a simple base can become unique with a few accents. Always do a quick test arrangement before attaching anything permanently to see what looks best.
Step-by-Step Guide: Assembling Your Hydrangea Wreath
Now that you have everything you need and your supplies are spread out, it’s time for the fun part—building your hydrangea wreath. Follow these easy steps, and you’ll have a showstopper in less time than it takes to finish your favorite podcast episode.
Preparing the Hydrangeas: Hydrangea Wreath Instructions
You’re not going to believe how easy these gorgeous wreaths are to make! Here’s what you’ll do:
- Trim Your Hydrangea Stems
Use wire cutters to trim the stems of your hydrangea flowers, making sure to leave just enough length so you can stick them securely into your wreath form. Aim for about 3-4 inches—this gives stability without being too bulky. - Create Your Design
Lay your trimmed flowers in a circle before attaching them. This helps you plan your color pattern and makes sure your arrangement looks balanced all the way around. - Add the Flowers to the Wreath
Start inserting each hydrangea stem into the grapevine wreath. For a tightly woven wreath, the stems should fit snugly with a gentle push. If your wreath base is on the loose side, use floral wire to wrap and secure each stem for a firmer hold. - Add a Bow
Once all the blooms are set, tie a wired ribbon around the bottom or top of your wreath. Shape it into a bold bow that matches your color scheme.
To keep your wreath looking fresh all year, pick cream for one of your three colors—then switch out the other two as seasons change:

- Spring & Summer: Cream, green, blue
- Fall: Cream, orange, brown
- Christmas: Cream, green, red
This quick swap trick keeps your wreath new and stylish without starting from scratch every season.

Arranging Blooms and Attaching to the Wreath Form
Arranging your hydrangea heads for that full, lush look is all about spacing and layering. Here’s how to get even results every time:
- Start with Three Main Colors
Place your first bloom, then add the second and third in a repeating pattern. This ensures your color distribution is even, giving a natural, professional look. - Cluster for Fullness
Angle your hydrangea heads slightly as you push them in. Tilt some forward and others a bit outward for a rounded shape. - Push Blooms Deep
Insert stems firmly into the grapevine base. Give a gentle tug to test. If any stem feels loose, secure it with a small loop of floral wire. - Fill in Gaps
Don’t be afraid to overlap petals. If you see a bare spot, tuck in extra leaves or twist a bloom to fill it out.
With each flower, take a step back and check for balance. Move blooms as needed before you secure everything tightly. The grapevine’s texture helps hold things in place, but floral wire adds extra peace of mind for windy days outside.
Adding Decorative Elements for Finishing Touches
When your hydrangeas are nestled in and the wreath looks full, you can go the extra mile with eye-catching details.
- Ribbon and Bows
Pick a wired ribbon that matches your flowers. Make a big, looping bow for the bottom or side of the wreath. Wired ribbon is easy to fluff and holds its shape. - Greenery or Extra Florals
With leftover eucalyptus, ferns, or other accent flowers, tuck in smaller sprigs at the edges. This gives depth and a touch of wildness. - Seasonal Touches
Add simple touches like faux berries, small pumpkin picks, or glittery accents for holidays. You can easily swap these details out as the year goes on. - Personal Touches
If you want to make it your own, add a small wooden sign or use floral wire to attach a monogram letter to the middle.
Secure decorative items with wire or a dab of hot glue. Step back and adjust anything that feels out of place. Finished, your hydrangea wreath should look tailored, vibrant, and ready to hang anywhere that needs a soft, happy burst of color.
If you enjoyed this project, share your wreath or spin on this idea. Your take could inspire others in the community. Thank you for following along, and keep an eye out for more easy home décor tutorials.


